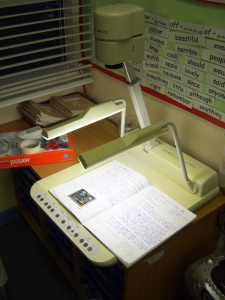
I had been aware of visualisers for a while, but it was at the BETT show last year that I first had a play with one on the Smart technologies stand, and I knew straight away that I had to have one! The ability to show children’s work immediately on a large screen, and even highlight and annotate it on the IWB without actually writing on it seemed fantastic, and an ideal tool for encouraging children to reflect on and improve their work. They are also fantastic for sharing books and small objects with the whole class.
However, there was no way as a PGCE student I could afford the £800 odd Smart were charging, so I decided to try to find a way to get the same functionality on a shoe string budget.
I turned first to the internet haven for cheap technology- eBay. Having once bought a £2000 mixing desk for £60 on there I am ever hopeful of true bargains, and although there were lots of bang up to date visualisers at silly prices, after some scouring and waiting I was lucky enough to find an old analogue model for £30!
This wasn’t the latest model by far- no USB connections here- just an analogue video output, and the plastic casing is almost as yellow as my 20 year old Amiga… However, it did the job of displaying childrens work when plugged into a data projector.

Me being me, I was never going to be satisfied with that, so I started looking into getting an analogue video input for my computer, and again eBay came up with the goods. Somewhat skeptically, I bought an RCA video to USB dongle for £15 (search for EasyCap USB), which turned out to be perfect. It isn’t the greatest resolution in the world, but it is good enough for running through a 1024×768 data projector, and allows you to bring up any video source on your computer screen. There are a multitude of these on eBay, but if you are a Mac user be sure to get one which specifically says it is Mac compatible as not all of them are.
Once I had this hooked up all I needed to do was find some software. Smart Notebook has fantastic integration with visualisers, but it only works with their own model, so I sought out something else that would allow me to achieve the same thing. For the PC I had in school that turned out to be a program called ‘Open Video Capture‘. This is only a limited trial, but for displaying a video input full screen you don’t need to pay for the full version.
For the Mac I found a program called VideoGlide capture, which you will have to pay for to remove a watermark, but it is not too expensive, and it does a great job.
With either of these programs active displaying the video input from the visualiser ‘Smart Tools’ allow you to pick up a pen and annotate, and scribble over the live video. You can even click the camera button to capture the screen as a still to Notebook- leaving the annotations editable so you can rub out and change them.

Since I have started using it I have found all sorts of uses for the system beyond simply displaying childrens written work. I have used it for displaying a live science experiment so we could annotate it with arrows showing the force, to allow a child to demonstrate to the class with clarity how to use a ruler or a mirror to find a line of symmetry, and recently to analyse the information on juice cartons for my year twos to allow them to define success criteria for their own carton designs. The camera is also a high enough quality to zoom in on a photographic negative, invert it, and display the photograph contained in it. This filled my Year 2 class with wonder during a lesson about the history of cameras (most of them had never seem a film camera before).


VideoGlide also allows recording of video and stop motion filming from the visualiser- so who know what we will end up doing with that… If you are using it on a Mac I highly recommend setting up application assignments for your spaces so you can flip between full screen video and notebook (as described here).
All in all I have found it to be a great tool for encouraging pupil reflection, and genuinely enhancing their learning many ways. For a total cost of around £70 and a bit of tinkering I have been able to achieve most of the functionality of a new model costing many times the price. It’s always easy to lust after expensive new technology, but sometimes a bit of tinkering can get the same results for much less, so I thought I would share my experiences with this as it may be useful for others lusting after a visualiser as I was!
Leave a Reply